Hi Friends! I'm looking forward to returning from Spring Break with my Compound Construction Crew. To prepare for this mini flip, I have purchased a few goodies, but the materials needed for this themed activity can be simply printed from my newest unit. Click the graphic below to link to my file.
For added excitement, I ordered a few props to enhance the flip. Each year, I buy props for one new flip. I often times use the materials for multiple lessons in a year. This helps me build a collection of materials that can be recycled for different activities.
This year I bought orange construction vests from Consumer Crafts. I also purchased another of the Antsy Pants collection tents. I already have a train, fire truck, bus, pirate ship, and market shop in their collection. There are several ways to purchase the collection. You can buy the poles separately and then purchased the slip covers or you can buy the kit. For mine, I have a few kits and the poles where I can buy the slip covers, saving money. Ansty Pants is sold at Target, Amazon, or their direct website.
Working in a title one setting, many of my kids have very little previous knowledge. For morning work, I will have my kids come into the classroom and investigate tools and vehicles used in construction. This is simply explore time for less than 15 minutes. I have the materials set up on rotation for four days to accommodate my four groups. I will update the post with images after we complete the lessons!
I like to start new skills by introducing them with a BrainpopJr Video. They're usually between 4-5 minutes and helps give a little background on Compound Words. I pay less than $10 a month for one home subscription to share the videos in class during my mini lessons.
Following the video, the kids will use their prior knowledge for individual words to help predict the meaning of a compound word. I have four examples to chart. Before revealing the sentence, I want to allow time for the kids to turn and talk about the words and their meanings. You can record a sentence the kids develop or glue the one provided. Repeat with each compound given. To follow up, students can work in pairs or groups to explain four additional compound words as a work time activity. This can be glued to the chart or independently recorded on their own reproducible page.
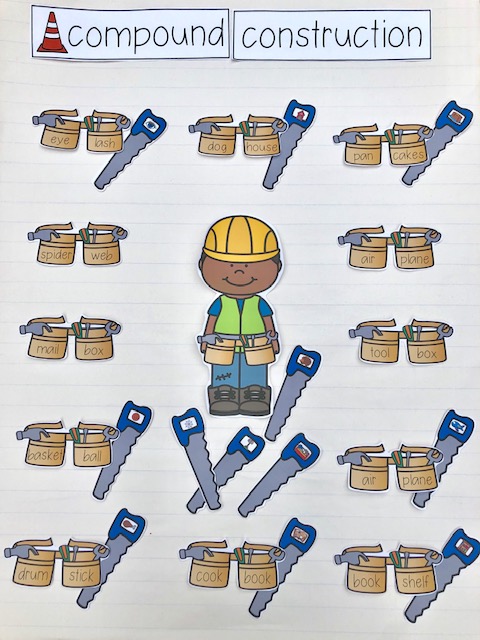
The following day, I will begin my mini lesson having the kids explain to me what they know about compound words. This is a time where I generate misconceptions and understandings. During my lesson, we will construct a second anchor chart with word parts written versus the visuals in yesterday's chart. The word parts are separated on different sides of a tool belt to help identify each word separately. The kids will determine the compound word and hunt for the matching saw that has the image of the compound word.
For a follow up activity, I prepare puzzles for the kids to work on. Depending on the level of the child, this activity can be completed in different ways. First, the kids can play as a game of concentration or simply matching puzzle parts. I've provided a two page reference pages with the images of the compound words students are looking for. For more of a challenge, the kids can be given the charts after they found the words. If students are struggling to read the frameparts, lay the charts out for additional assistance.
If you wish, you can also cut out the chart and scatter all the puzzle pieces and image. Have the kids find all three parts for a match.
Since I don't have a closing, I provided several journal pages for the kids to record the compound word for independent practice.
After my class has had a few solid days of lessons practicing the skill of compound words, I will do a mini flip of my room. I use the above mentioned props and a few from my unit for our compound construction day. Each child will receive a hard hat and tool belt.
In their tool belt, I have prepped pipe parts for the kids to build a compound word. I have given each child several matches and a few pieces that will not create a compound word. They have a Compound Construction Manual with three drafts of the Blueprint Designs. Students will construct their compound parts and glue to the pipe template. Then they will record the compound word and engineer a sentence using the word. I provided two different versions depending on the level of your student.
For more of a challenge, I took away the visual and provided tools for a plus sign. This forces the kids to determine the compound word parts by constructing words based of their previous knowledge.
While the construction is taking place in classroom, I will set the mood with construction noises. I linked the hour long video in my unit.
Teachers, I hope you have a magnificent time with constructing compound words. If you love this unit, you may wish to check out contraction surgery. It will generate as much excitement as the construction theme. Click the image below to link over and read my post!
Coming back from winter break is always one of my favorite times of the school year. I typically transition into informational writing with a focus on text features! Although we've had nonfiction lessons previously, I dissect the standards and give my students a full, holistic approach to the topic.
Over the past month, my students have meandered through various lessons that led up to a collaborative research project with a partner. I couldn't be more excited by the outcome. So, let me rewind the clock a bit and take you through my lessons from the beginning.
In mid January, I updated a set of lessons for Nonfiction Text Features that I originally created back in 2011. You can click the graphic below to snag the freebie unit. Please consider leaving feedback!
My first set of lessons helped my students understand fiction and nonfiction. Although the unit is broken into different lessons, a lesson could take more than one day to complete, especially with the extension lessons provided.
We started with fiction using Bear Snores On. The kids helped me chart what they noticed during the read aloud. I didn't think to take a picture of the chart but a sample of ideas is provided in the file. Afterwards, we took a nonfiction book walk using National Geographic Bears. Again, the kids helped me chart what they noticed.
We spent a few days on the Bears Information Reader because there was so much content that the kids were identifying. In fact, I went off my plans at this point and started to share some of the text feature posters when my students identified them in the text.
We read a few chapters over several days, specifically out of order. This helped us to understand that we can read informational texts in any order unlike the fictional text, Bear Snores On. To prove the point, I checked out the sequel, Bear Wants More. I tried to read it starting in the middle. The kids decided the book had to be read cover to cover because it had a beginning, middle, and end that must be sequenced.
To ensure my students understanding, I gave my kids a book sort. I started with Velma Gratch and The Way Cool Butterfly AND National Geographic's Caterpillar to Butterfly. With an obvious cover that gave clues, my kids easily identified which was fiction and nonfiction; and sorted the books in a reproducible activity. Then I asked the kids to sort Wonderful Worms and Diary of a Worm. This took a little more inferencing and schema to determine which might be the fiction. The covers were less obvious. The kids and I decided that we needed to read the text to further determine how to sort. I had one kid that could intelligently tell me based on his understanding that worms won't write a diary. Most of the kids were hung up on an illustration and photograph.
Now that the kids had a better understanding of fiction and nonfiction, we moved into facts and opinions. I decided to use dandelions to help create the opinions. Given that many had no idea what a dandelion were, I knew I needed to pick a bunch and bring them in.
If you're interested in the posters featured in the photographs, I have a file for comprehension skills and strategies available here. I also have one for reading genres here.
Okay, back to my lessons... I used two books to assist in the next few lessons; one for opinions and the other for facts.
Dandelions: Stars in the Grass gave a few good places where we could stop and discuss opinions. Following our reading and discussion, the kids were given both forms of a dandelion. But before we could investigate, we needed to dress the part.
This investigation helped us develop an opinion of our favorite form of dandelion: white fluff or yellow star shape?
The following paper melted my heart. If you knew this kid and his family, then you'd know they're a Disney Family and visit this magical park often. I knew the moment I read what he wrote, it must have been a true connection and solid reason.
Once I was certain my students had an understanding of opinions, we transitioned the following day to facts. I read the Scholastic Information Reader, From Seed to Dandelion. The kids used four sticky notes while sitting on the carpet listening to me read. They were to record four ideas for sentences. Afterward, they were given four star shaped papers that were die cut for their facts. We created the dandelion habitat on a sentence strip. The Fact Mobile turned out adorable!!!
At this point, my kids had a lessons on facts and opinions and were ready for text features. If you recall, we had previewed the nonfiction books for text features the previous week when we strayed from the written lessons. To expand on our previous lessons, I saved extra copies from my Scholastic Magazines orders. This is something my grade level receives each month. If you don't have a subscription, look into this magazine. It's great! I emailed the staff at my school and asked if anyone had any extra Scholastic Magazines they hadn't used. Each grade level receives the monthly subscription with four different weeks in each monthly packet. What I love about the magazines are there are plenty of examples, but the trouble is each magazine only features two or three. You really need to have extras sitting around to cut out and categorize during the feature hunt.
Since I found it difficult to track down enough magazines for the kids to complete the activity as mentioned in my lessons, I modified and used all my different National Geographic Readers I've collected over the years. Scholastic bundles them often and many can be purchased separately at Barnes and Nobles or Amazon. I gave each partner a different color sticky note pad and allowed them to hunt for as many different text features as they could find.
My favorite thing about these readers are the differentiated levels provided. They have a Ready to Read series, Level 1, Level 2, and Level 3.
Here's a glimpse at a video of two of my boys who partnered for the book hunt. They're explaining the features they found. Keep in mind, these boys are in first grade. One is six and one is seven years old and only had three lessons on text features by the time this video was filmed.
During the time of the hunt, my class and I played several rounds of text feature BINGO together. With the help of a title one teacher, we played for several days during our reading block and then the following days during dismissal.
Here's a glimpse of my class playing the BINGO game. I play several rounds with them. One of the rounds I called out the text feature and the second round I called out the definition. The kids developed a better understanding of the features!
Following a few days of playing text feature BINGO, the kids pulled out their leveled National Geographic Reader that they used for their book hunt and were given my Text Feature Journal to explain the features they found in their book.
Now that we are experts, we are ready for writing informational papers with text features. The kids spent several days reading and determining what facts would be best for a retelling. Many kids searched for a second book on topic in my library or the school's library. Here's a peek at one of the papers.
In order for the kids to properly identify, order and create bold print words, I had partners flag the vocabulary word they'll be using in their glossary with sticky notes. They are to explain to me why they think the word flagged belongs in the glossary. This helps me gather a small group for reinstruction if needed. Once the kids have found vocabulary that can be defined, they then number the words to show ABC order. I check in with them once they're numbered and confirm the order before they recorded their words and defined them in their glossary.
You can access the freebie informational writing unit with options for aquatic, farm, forest, insects, and wild animals. The file was originally created in 2012 and updated today. It includes all that is shown in the informational paper above and the checklist for students to hold each other accountable for adding the text features. Just click the image below to download. Please consider leaving feedback.
I hope you love our lesson progression and both longtime freebies embedded in this post. If you will please leave me a comment and feedback on the products, I would appreciate hearing from you! Happy Teaching, Friends!
After several request asking to see different samples, I'm loading papers from varying levels in my classroom. You will see work from reluctant writers, emerging writers, and developing writers in no particular order.